
spring boot进行定时任务一共有三种方式,开启第一种也就是定时的种最简单的一种:基于注解 (@Scheduled)的方式 ;第二种:基于接口 (SchedulingConfigurer) ;第三种:基于注解设定多线程定时任务 。
首先,打开idea,定时的种创建springboot项目,任务无需引入任何jar,开启springboot自带定时。定时的种
然后,任务在启动类中用注解@EnableScheduling进行标注,开启表明此类 存在定时任务。定时的种在定时执行的任务方法之上添加注解
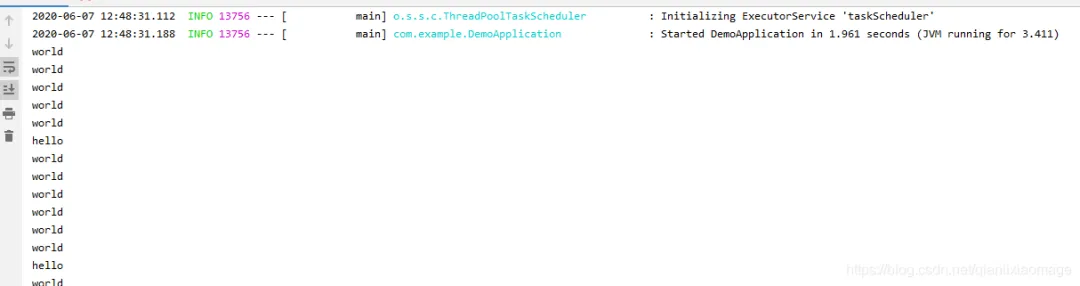
复制@Scheduled(cron ="*/6 * * * * ?")。1. 复制package com.example.demo; import org.springframework.boot.SpringApplication; import org.springframework.boot.autoconfigure.SpringBootApplication; import org.springframework.scheduling.annotation.EnableScheduling; import org.springframework.scheduling.annotation.Scheduled; @SpringBootApplication @EnableScheduling public class DemoApplication { public static void main(String[] args) { SpringApplication.run(DemoApplication.class,开启 args); } @Scheduled(cron ="*/6 * * * * ?") public void sayHello() { System.out.println("hello"); } }1.2.3.4.5.6.7.8.9.10.11.12.13.14.15.16.17.18.19.20.21.点击启动,即可看到控制台6秒输出一次“hello”。定时的种
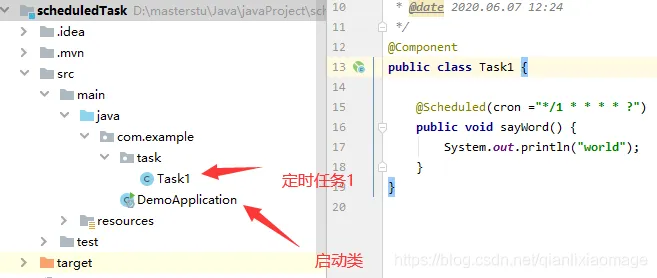
当然,任务定时任务也可以放在其他类中。例如创建类Task1。
复制package com.example.task; import org.springframework.scheduling.annotation.Scheduled; import org.springframework.stereotype.Component; /** * @Description * @ClassName Task1 * @Author User * @date 2020.06.07 12:24 */ @Component public class Task1 { @Scheduled(cron ="*/1 * * * * ?") public void sayWord() { System.out.println("world"); } }1.2.3.4.5.6.7.8.9.10.11.12.13.14.15.16.17.18.19.然后可以看到控制台的输出结果:
 图片
图片
这里有个要注意的细节,就是启动类需要能扫描到定时任务类,否则定时任务启动不起来。不仅需要@Component注解,云服务器提供商也需要将启动类位置位于定时任务类之上。如下图:
 图片
图片
笔者就是犯了这样的错,一直没启动起来。
@Scheduled除过cron还有三种方式:fixedRate,fixedDelay,initialDelay
cron:
fixedRate:
复制@Configuration @EnableScheduling //开启定时任务 public class ScheduleTask1 { //每3秒执行一次 @Scheduled(fixedDelay = 3000) private void myTasks() { System.out.println("I do myself per third seconds"); } }1.2.3.4.5.6.7.8.9.fixedRate:
复制@Component @EnableScheduling //开启定时任务 public class ScheduleTask2 { //每10秒执行一次 @Scheduled(fixedRate = 10000) private void myTasks2() { System.out.println("我是一个定时任务"); } }1.2.3.4.5.6.7.8.9.initialDelay:
复制@Component @EnableScheduling //开启定时任务 public class ScheduleTask { //容器启动后,延迟10秒后再执行一次定时器,以后每10秒再执行一次该定时器。 @Scheduled(initialDelay = 10000, fixedRate = 10000) private void myTasks3() { System.out.println("我是一个定时任务3"); } }1.2.3.4.5.6.7.8.9.cron
cron 用法跟linux下是一摸一样的,如果你搞过linux下的定时,那么必然很熟悉。
结构
cron表达式是一个字符串,分为6或7个域,每两个域之间用空格分隔,
其语法格式为:"秒域 分域 时域 日域 月域 周域 年域"
取值范围
常例
本方法的demo地址: https://github.com/SUST-MaZhen/scheduledTask.git
使用@Scheduled 注解很方便,但缺点是当我们调整了执行周期的时候,需要重启应用才能生效,这多少有些不方便。为了达到实时生效的效果,那么可以使用接口来完成定时任务,统一将定时器信息存放在数据库中。
在mysql中执行一下脚本插入定时任务:
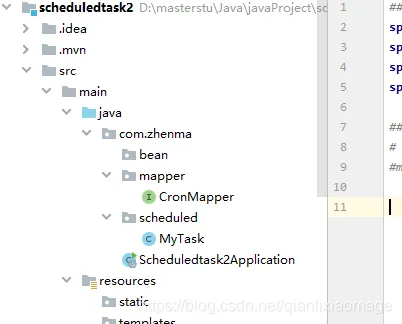
复制drop table if exists `scheduled`; create table `scheduled` ( `cron_id` varchar(30) NOT NULL primary key, `cron_name` varchar(30) NULL, `cron` varchar(30) NOT NULL ); insert into `scheduled` values (1,定时器任务一,0/6 * * * * ?);1.2.3.4.5.6.7.创建一个springboot 项目:我们这里只添加一个mapper,免费信息发布网不要bean也不要service以及controller,只是为了演示定时功能而已。demo结构:
 图片
图片
数据源基本配置:
复制## mysql数据源配置 spring.datasource.url=jdbc:mysql://host:3306/dbname?useUnicode=true&serverTimeznotallow=Asia/Shanghai spring.datasource.username=root spring.datasource.password=123456 spring.datasource.driver-class-name=com.mysql.cj.jdbc.Driver ## Mybatis 配置 # 配置为 com.example.bean 指向实体类包路径 #mybatis.typeAliasesPackage=com.zhenma.bean1.2.3.4.5.6.7.8.9.mapper也就是dao:
复制package com.zhenma.mapper; import org.apache.ibatis.annotations.Mapper; import org.apache.ibatis.annotations.Select; import org.springframework.stereotype.Repository; @Repository @Mapper public interface CronMapper { @Select("select cron from scheduled where cron_id = #{id}") public String getCron(int id); }1.2.3.4.5.6.7.8.9.10.11.12.task类:
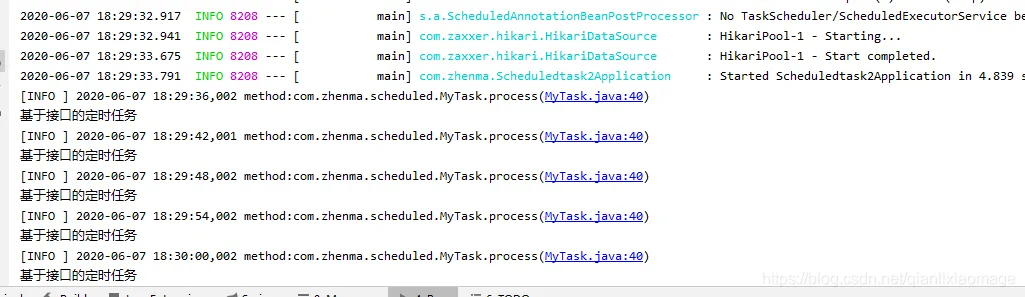
复制package com.zhenma.scheduled; import com.zhenma.mapper.CronMapper; import org.springframework.beans.factory.annotation.Autowired; import org.springframework.scheduling.annotation.EnableScheduling; import org.springframework.scheduling.annotation.SchedulingConfigurer; import org.springframework.scheduling.config.ScheduledTaskRegistrar; import org.springframework.scheduling.support.CronTrigger; import org.springframework.stereotype.Component; /** * @Description * @ClassName MyTask * @Author User * @date 2020.06.07 15:23 */ @Component @EnableScheduling public class MyTask implements SchedulingConfigurer { @Autowired protected CronMapper cronMapper; @Override public void configureTasks(ScheduledTaskRegistrar scheduledTaskRegistrar) { scheduledTaskRegistrar.addTriggerTask(() -> process(), triggerContext -> { String cron = cronMapper.getCron(1); if (cron.isEmpty()) { System.out.println("cron is null"); } return new CronTrigger(cron).nextExecutionTime(triggerContext); }); } private void process() { System.out.println("基于接口定时任务"); } }1.2.3.4.5.6.7.8.9.10.11.12.13.14.15.16.17.18.19.20.21.22.23.24.25.26.27.28.29.30.31.32.33.34.35.36.37.38.39.运行结果:
 图片
图片
从结果中可以看出,是按照每6秒也就是数据库中查询的结果来进行的。
需求:我现在需要每10秒执行一次定时任务,该怎么办呢?对!只需要修改数据库值即可,server无需重启。观察修改后的结果。
 图片
图片
感觉好(。・∀・)ノ゙嗨哦。
demo地址:https://github.com/SUST-MaZhen/scheduledtask2.git
前面讲到了@Scheduled执行周期任务会受到上次一个任务的执行时间影响。那么可以开启多线程执行周期任务。
创建springboot项目,创建一个多线程定时任务类如下:
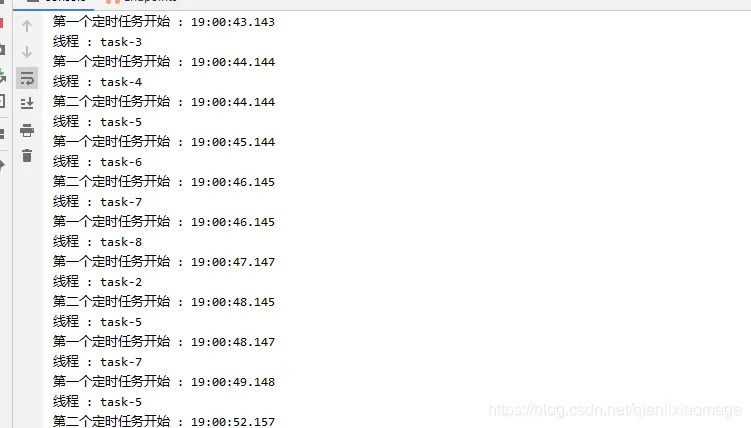
复制package com.example.task; import org.springframework.scheduling.annotation.Async; import org.springframework.scheduling.annotation.EnableAsync; import org.springframework.scheduling.annotation.EnableScheduling; import org.springframework.scheduling.annotation.Scheduled; import org.springframework.stereotype.Component; import java.time.LocalDateTime; /** * @Description * @ClassName MultiThreadTask * @Author User * @date 2020.06.07 18:56 */ @EnableScheduling // 1.开启定时任务 @EnableAsync // 2.开启多线程 @Component public class MultiThreadTask { @Async @Scheduled(fixedDelay = 1000) //间隔1秒 public void first() throws InterruptedException { System.out.println("第一个定时任务开始 : " + LocalDateTime.now().toLocalTime() + "\r\n线程 : " + Thread.currentThread().getName()); Thread.sleep(1000 * 10); } @Async @Scheduled(fixedDelay = 2000) public void second() { System.out.println("第二个定时任务开始 : " + LocalDateTime.now().toLocalTime() + "\r\n线程 : " + Thread.currentThread().getName()); } }1.2.3.4.5.6.7.8.9.10.11.12.13.14.15.16.17.18.19.20.21.22.23.24.25.26.27.28.29.30.31.32.33.34.执行结果如下:
 图片
图片
从结果可以看出:第一个任务的执行时间也不受其本身执行时间的限制。两个任务也互不影响。
demo地址: https://github.com/SUST-MaZhen/scheduledtash3.git
本文介绍了spring boot创建定时任务的三种方式,当然还有其他方式,例如最近本的定时器来进行等等。
企商汇相关文章:
源码库益华科技源码下载香港云服务器亿华云服务器租用IT技术网IT资讯网企商汇汇智坊益强前沿资讯智能时代益强科技益强科技创站工坊码上建站益强编程舍亿华互联亿华云码力社益强智囊团云智核运维纵横IT资讯网益强资讯优选多维IT资讯科技前瞻思维库极客编程益强IT技术网亿华智造亿华智慧云益强编程堂云站无忧亿华灵动益强数据堂益华IT技术论坛极客码头亿华云计算亿华科技益强智未来益华科技全栈开发益华科技
0.154s , 11729.8515625 kb
Copyright © 2025 Powered by Spring boot开启定时任务的三种方式,汇智坊 滇ICP备2023006006号-2